Disabling automation in Salesforce is one of those tasks most teams don’t think about until they really need it.
It usually comes up during a backfill, a data fix, or a cleanup that should be routine but suddenly isn’t. Automation fires when you don’t expect it to, records update in ways you didn’t intend, and you’re left deciding between stopping everything or working around it.
This guide walks through a practical automation control switch built by Brent, one of our very own Candybox consultants, based entirely on a real implementation we use. If you’ve ever paused before clicking “Update” on a bulk job, this will probably feel familiar.
What This Automation Control Does
At its core, the goal is simple:
👉 Decide, at runtime, whether automation should run, and exit early if it shouldn’t.
In practice, that’s harder than it sounds. Automation in Salesforce tends to be spread across Flows, Apex,, and edge cases that only surface when something breaks.
This solution centralizes that decision and supports:
- Apex triggers
- Record-triggered Flows
- Object-level control
- User-level control
- Automatic re-enabling through expiration dates
Everything resolves to a single boolean decision that automation checks before running.
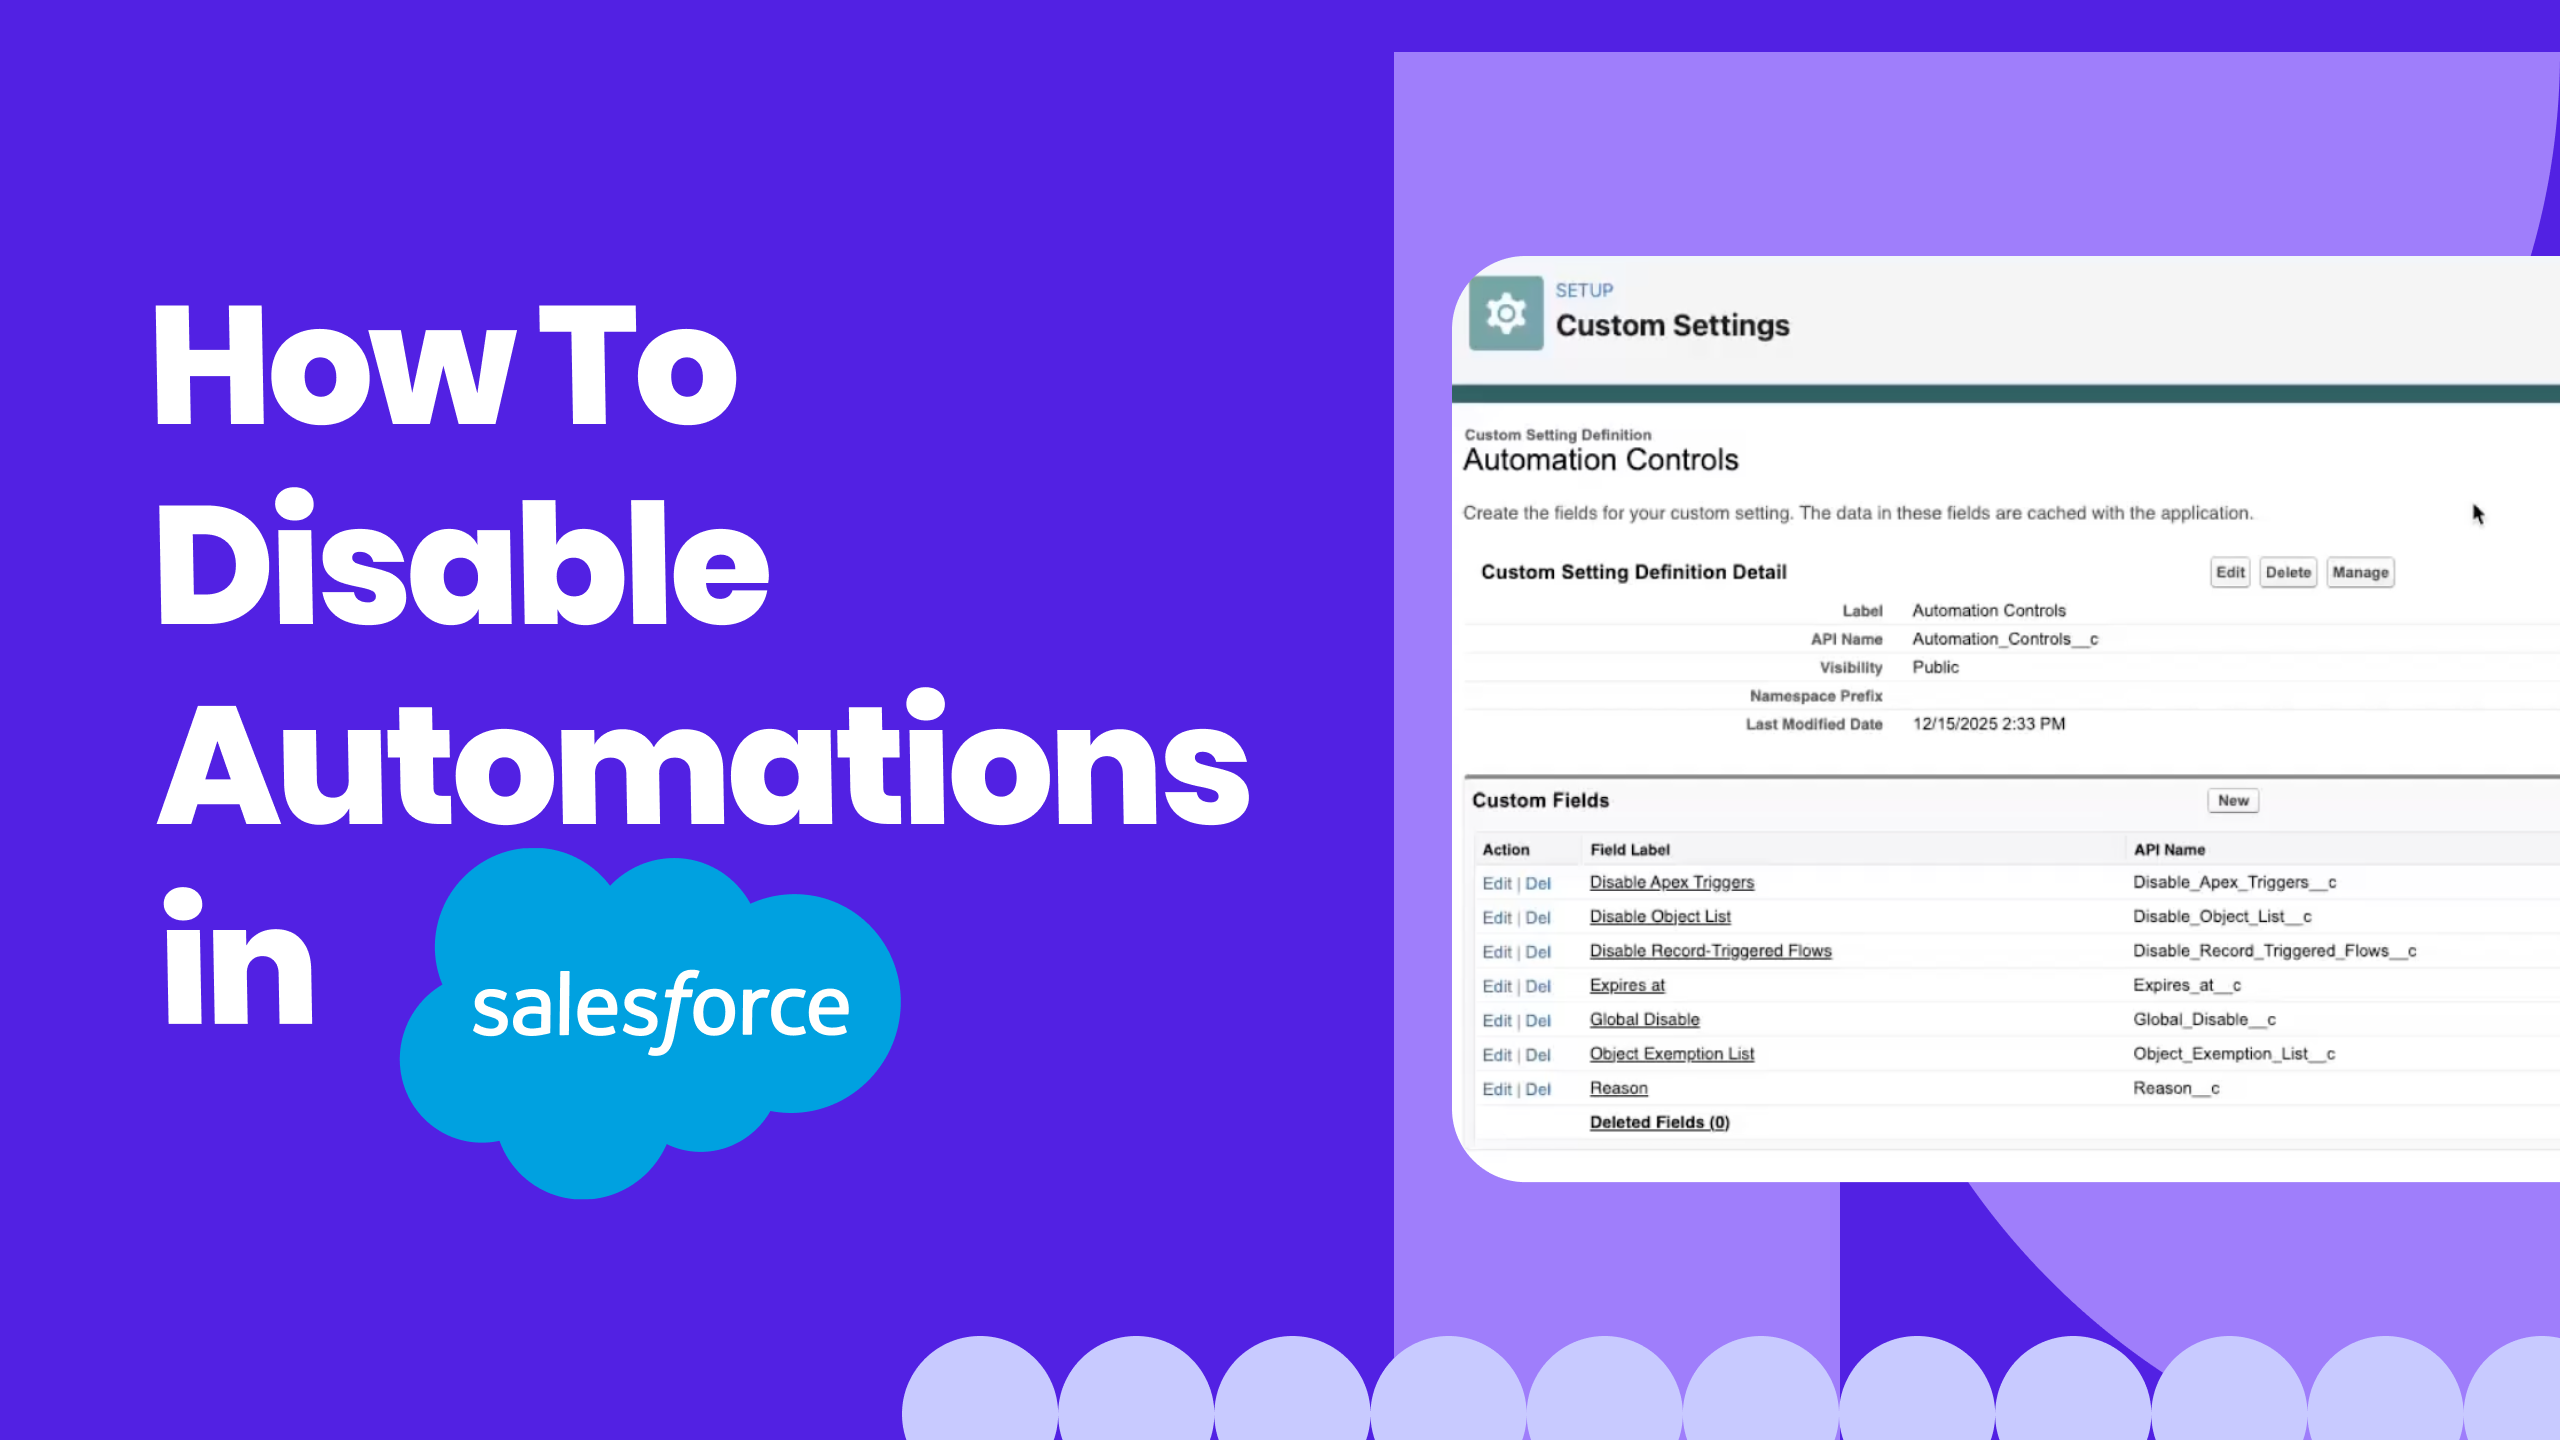
Core Component: Hierarchy Custom Setting
The backbone of the solution is a Hierarchy Custom Setting called Automation Controls.
Hierarchy custom settings behave like objects but allow values to be defined at different levels:
- Organization
- Profile
- User
From experience, this is one of those Salesforce features that’s easy to overlook but when you need scoped control without branching logic everywhere, it’s hard to beat.
Fields Used in Automation Controls
The custom setting includes the following fields.
1. Global Disable
- Overrides all other settings
- Disables all Apex triggers and all record-triggered Flows
- Intended for full shutdown scenarios
This is the “everything stops” switch. It’s useful, but not something you want to rely on often.
2. Disable Apex Triggers
- Disables Apex triggers that reference this automation control switch
- Can be combined with object-level targeting
3. Disable Record-Triggered Flows
- Disables record-triggered Flows
- Evaluated using the same logic as Apex
4. Disable Object List
- A list of object API names
- If populated, automation is disabled only for those objects
- If left blank, automation is disabled for all objects
This detail matters more than it sounds because it avoids having to list every object just to exclude one.
5. Object Exemption List
- Allows broad disabling while exempting specific objects
- Useful when you want a wide shutdown but need certain processes to keep running
We’ve found this especially helpful in orgs where one object is “too critical” to pause.
6. Expiration Date
- Automatically re-enables automation after a set date
- Prevents automation from being left off indefinitely
In practice, this is one of the safest guardrails you can add.
7. Reason / Notes (Optional)
- Records why automation was disabled
- Helpful later when someone asks, “Why wasn’t this firing?”
How the Logic Is Evaluated
All automation checks resolve to a true / false outcome:
- true → automation should be disabled
- false → automation should run
The evaluation order is consistent everywhere:
- If the current date is past the expiration date → automation runs
- Global disable overrides everything
- Exemption list is evaluated
- Object list is evaluated
- Automation-type flags are applied
Keeping this order consistent is what makes the behavior predictable when multiple controls are set at once.
Applying the Kill Switch to Record-Triggered Flows
The demo shows two supported approaches, depending on how centralized you want the logic to be.
Option 1: Formula Field (Object-Level)
For each object with record-triggered Flows:
- Create a formula field (e.g. Disable_Flows__c)
- The formula evaluates the Automation Controls hierarchy
- It returns true or false
You then reference that field in the Flow’s entry conditions.
Things to keep in mind:
- You’ll need a formula field per object
- The logic is very visible, which some teams prefer
- Maintenance increases as automation grows
This approach is straightforward, but it can add up in larger orgs.
Option 2: Shared Subflow (Centralized)
To reduce per-object maintenance, the solution also includes an autolaunched subflow.
How it works:
- The subflow accepts the object API name as input
- It evaluates the Automation Controls logic
- It returns a boolean
In each record-triggered Flow:
- Add a decision element at the top
- Call the subflow
- Exit early if automation is disabled
This keeps the logic in one place and avoids repeating formulas across objects.
Gotchas - Subflows cannot be called from Before-Save (fast field updates) flows and object formula fields are null on Create in Before-Save flows. In these scenarios, it is necessary to copy the formula logic that evaluates the Automation Controls custom setting directly into the flow as a formula and reference that formula in a Decision component that contains a path to end the process if the formula evaluates to TRUE.
Applying the Kill Switch to Apex Triggers
For Apex, the solution uses a simple helper class.
Disabled Triggers Apex Class
- Contains a single method
- Accepts an object name
- Returns true or false
Trigger Implementation
At the very top of the trigger:
- Call the helper method
- If it returns true, exit immediately
This pattern is intentionally minimal — the goal is to make the decision once and get out of the way.
Scoping Automation Control (Org, Profile, or User)
This is where hierarchy custom settings really show their value.
Automation can be disabled:
- Org-wide
- For a specific profile
- For a specific user
Example: User-Level Backfills
If you need to backfill records:
- Disable automation only for your user
- Perform the updates
- Other users continue working as normal
This avoids the familiar tradeoff between “do it after hours” and “risk impacting everyone.”
What This Solution Does Not Do
This automation control switch:
- Does not automatically apply unless Flows and triggers reference it
- Does not replace automation governance
- Does not fix poorly designed automation
Think of it more as a control mechanism rather than a shortcut.
A Note From the Candybox Team
This automation control switch came out of real delivery work. Our customers are constantly balancing safety, speed, and long-term maintainability in live Salesforce orgs.
At Candybox, we spend most of our time helping RevOps and Salesforce teams design automation that’s flexible, predictable, and easy to control. Especially in moments like backfills, migrations, and cleanups.
If you’re thinking about implementing a pattern like this and want a second set of eyes on your approach, we’re always happy to talk through it.
Contact us and let’s start a conversation.


.png)