.png)
How to Set Up a Dedicated Integration User in Salesforce
Creating a dedicated Salesforce Integration User is one of the most effective ways to manage third-party integrations securely and at scale. Whether you're integrating with tools like HubSpot, Marketo, or any other platform, a custom Salesforce integration user allows you to apply fine-grained permissions, protect sensitive data, and maintain better audit controls.
In this guide, we’ll walk you through the steps for setting up a Salesforce integration user, covering key considerations such as permission set management, field-level security, and record-level access through sharing rules.
Why Use a Dedicated Salesforce Integration User?
Many third-party tools require broad access to your Salesforce org to function correctly. Without careful setup, these integrations can unintentionally expose sensitive records or fields. By using a Salesforce integration user with limited permissions, you gain full control over what the integration can see or change—boosting data privacy and security.
Additionally:
- Salesforce provides five free Integration User Licenses
- Separate users improve troubleshooting and monitoring
- Dedicated users prevent sync disruptions due to employee attrition
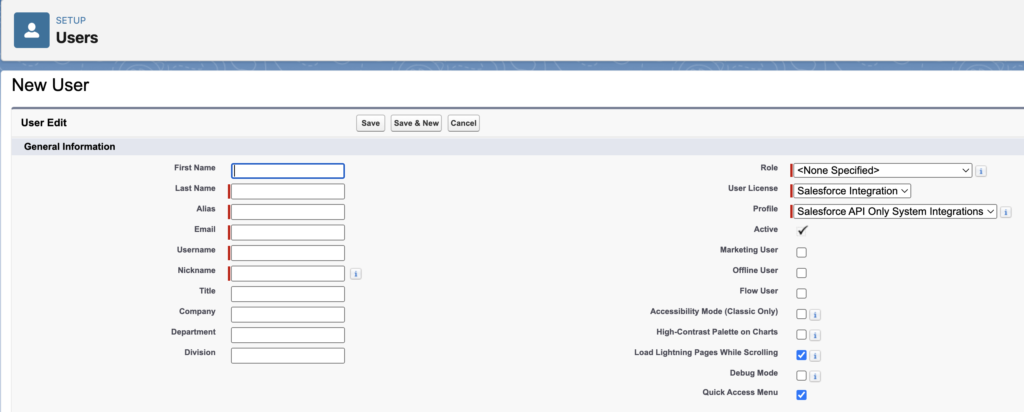
Step 1: Create a New Salesforce Integration User
- Log in to Salesforce as an Admin.
- Go to:
Setup > Users > New User - Fill in the fields:
- First Name: (Optional)
- Last Name: e.g. "HubSpot Integration"
- Email: A dedicated email for this integration
- Username: Must be unique (e.g., hubspot-integration@yourdomain.com)
- Role: Choose or create a role such as "Integration User"
- User License: Salesforce Integration
- Profile: Salesforce API Only – System Integrations
- Click "Save".
Assign the API Integration License
- On the user detail page, go to Permission Set License Assignments
- Click "Edit Assignments", then enable Salesforce API Integration
- Click Save
Step 1: Create a New Integration User
- Log in to Salesforce as an administrator.
- Go to Setup > Users > New User.
- Fill in the required fields:
- First Name:[Optional]
- Last Name: [Something meaningful like the Name of the Integration]
- Email: [a dedicated email address for the integration user]
- Username: [a unique username for the integration user]
- Role: [assign an appropriate role, e.g., Integration User]
- User License: Salesforce Integration
- Profile: Salesforce API Only System Integrations
- Click "Save" to create the new Integration User.
- Assign the "Salesforce API Integration" permission set license to the newly created user by clicking on the "Permission Set Group Assignments [x]" link at the top of the user detail page.
- Click "Edit Assignments" in the “Permission Set License Assignments” section of the page
- Scroll down to the "Salesforce API Integration" permission set license
- Check the box in the "Enabled" column
- Scroll to the top/bottom of the page and click save
⚙️ Step 2: Restrict Access to Sensitive Fields
Controlling field-level access is essential to prevent exposing sensitive information during data sync.
To configure field-level security:
- Go to
Setup > Object Manager> Select Object (e.g., Account, Contact) - Click Fields & Relationships > Select a field
- Click "Set Field-Level Security"
- Uncheck the "Visible" box for the Integration User profile
- Click Save
- Repeat for all fields that should remain hidden from the integration
Step 3: Create a Custom Permission Set (Optional)
Since Salesforce is retiring profile-based permissions in Spring ’26, managing access via Permission Sets is best practice.
To create a custom permission set:
- Go to Setup > Users > Permission Sets > New Permission Set
- Name it something like "[Integration Name| Access" (e.g. HubSpot Sync Access)
- Save the permission set
- Add Object and Field Permissions based on integration requirements
- Add System Permissions if needed (e.g., API access, metadata editing)
- Assign the permission set to the Integration User under Manage Assignments > Add Assignments > Select user > Assign
Step 4: Create a Public Group for the Integration User
Salesforce Sharing Rules don’t apply to individual users, so you’ll need to create a Public Group that includes your integration user.
- Go to Setup > Users > Public Groups
- Click "New Group", give it a label (e.g., "HubSpot Integration Group")
- Save the group
- Click Manage Members > Add the Integration User
Step 5: Configure Sharing Rules for Record-Level Access
To limit which records an integration can access, use a combination of checkbox fields and sharing rules.
Create a Custom Field:
- Go to the desired Object (e.g., Account)
- Add a custom Checkbox field, e.g., "Send to HubSpot"
- Set the checkbox to TRUE only for records you want to sync.

Set Org-Wide Defaults:
- Go to
Setup > Security > Sharing Settings - For each object (e.g., Account, Contact), set Org-Wide Defaults to Private
Create Sharing Rules:
- Scroll to the object’s section (e.g., Account Sharing Rules)
- Click New Sharing Rule
- Set:
- Rule Type: Based on Criteria
- Criteria:
Send to [Integration] = TRUE - Share With: The Public Group from Step 4
- Access Level: Read/Write
- Save
Repeat this process for each object relevant to your integration.
Now, the Integration User will only have access to Account records where the "Send to [Integration]" checkbox is checked.
Additional Resources
- SalesforceBen – Permissions Retirement on Profiles (Spring ’26)
- HubSpot – Salesforce Selective Sync Guide
- Salesforce – Sharing Settings Documentation
Need Help Configuring Your Integration User?
At Candybox, we help RevOps and Salesforce admins set up secure, scalable integration users tailored to your tech stack. Whether you're connecting HubSpot, Marketo, Segment, or other platforms, we can help optimize your sync architecture, reduce risk, and maintain system performance.
👉 Reach out to us here if you'd like help setting up or auditing your Salesforce integration users.